

Need help with your kiln?
Call us at 314-963-0180
Email help@kilnparts.com
KilnParts.com Part Numbers
1000324 – Blank Ring Band for 714 or 145 Skutt Part Numbers 0458 – Blank Ring Band for 714 or 145
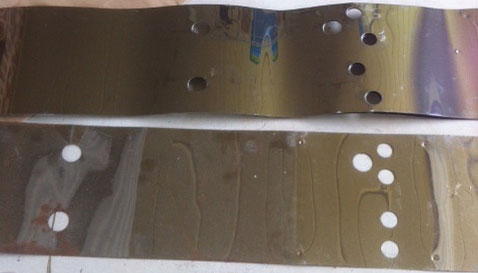
There are two types of bands available depending on the age of your kiln. Older kilns use a slightly different band, but don't worry it's easy to tell what you need!
If the element pigtails inside your kiln control box form a straight line (bottom band in the image below) your kiln uses the old style band and if the element pigtails are offset you need a new style band (top band in the image below).
If you need to replace the band on your Skutt electric kiln, don't worry, it's a fairly straightforward process. The bricks are not held in place by any cement, only the tension of the band, so if you need to change a band it's also a good time to change any broken bricks. To change a band follow these steps:
1. Unplug the kiln!
2. Remove the control box and set it aside. On KM kilns you will need to remove the 4-7 screws (depending on model) from the left side of the control box so the box can swing open. You unplugged and/or turned off the power to the kiln, right? Remove the female tab connectors from the terminal strip and lift the control box off it's hinges and set it aside. If you have a KS kiln the procedure is similar, but you will also need to remove the kiln sitter tube from the faceplate by removing the two screws holding it on.
3. Remove the lid from the kiln and unstack the kiln to gain access to the section you are planning to work on. Place the section on a flat surface. Remember, the bricks are only held in place by the band, so it's important that the section be as flat as possible.
4. Remove all the hardware from the section including handles, buckles, lid hardware and the heat shield. Save the screws! To remove the heat shield you will need to cut the element connectors so have the correct spare elements ready for your kiln.
5. Loosen the worm drive screws on the back of the heat shield. Some WD-40 can help with rust. Once the band is loose enough, slide it up and over the section. Be careful, the metal bands have sharp edges. Remember, the brick is now loose.
6. Put the new section in place being careful to make sure it is oriented correctly. The band should be centered vertically on the bricks. Some small 1/8" thick wooden shims can help hold it in place. Start to tighten the worm drive screws. Tighten the worm drive screws evenly from top to bottom. Take a look at the video available under the tab "Product Videos" for more information on how to tighten the band.
7. Install the new elements, replace the hardware and restack the kiln.
Tightening Skutt Kiln Bands